
From Hive to Hand: Alex Mulholland’s Beeswax Processing Journey
One of our incredible hosts, Alex Mulholland, turned some of our excess wax cappings from honey extraction into beautifully filtered wax bars. If you’re curious about the extraction process, check out our blog Is Honey Just Bee Vomit?—you’ll find a honey extraction video at the top, where the first step is using a hot knife to scrape wax cappings off the honey frames. After draining any remaining honey, we store the cappings in large, 5-gallon buckets. When Alex asked for a bucket to process the wax, we were eager to see what she’d create! She kindly documented her process, sharing incredible details and stunning photos.
This blog is written from Alex Mulholland’s perspective, with edits and presentation by Claudia Roller.
This is what I learned from some quick online research:
There doesn’t appear to be one favored method of processing
It can be VERY messy :-)
Anything that touches the waxy mixture will be difficult/impossible to clean afterwards!
Generally, processing the cappings does three things:
Filters out any solids
Removes residual honey & other water-soluble impurities
Leaves the wax in a practical size for its chosen purpose

I started out with about 3lbs of wax cappings.
Online, there is a mix of stove-top and oven-based approaches. In the end, I tended towards this oven-based method, which seemed to offer the least risk of mess. I have a lot of used aluminum trays, and didn’t want to sacrifice a cooking pot.
The video actually starts by recovering the residual honey that is left over in the cappings. I adapted it based on some of the other videos I watched and decided not to try and recover any honey. I opted for this decision because these cappings had been stored for a significant time, and they came from the top of the storage bucket, so I suspect most of the honey had, by now, drained to the bottom of the 5 gal bucket.
The first step was to put the cappings, and some water, into a (used) aluminum foil tray and heat it. This step was necessary to separate the wax from the honey and any other water-soluble contaminants present in the wax. I started by adding a pint of water, then as the cappings started to melt I added another half pint of water. I didn’t want to add too much weight, as I wanted the tray to keep its general shape.

The melting point of beeswax is documented as 145°F, so I started the oven at 170°F, but ended up at 220°F for about an hour. The flash point of beeswax is 400°F, which is the lowest temperature at which a liquid gives off enough vapor to ignite, so I wanted to stay well below that! I used (disposable) wooden chopsticks to poke/agitate the mixture occasionally as it melted. Once the wax was fully melted (and floating on top of the aqueous layer since beeswax is less dense than water), I let it cool.

You can see that the solid contaminants are on the upper and lower surfaces of the wax, so a non-filtering approach would be to simply slice off the contaminated wax - in that case I think you’d want to have the wax in a much thicker layer to minimize waste.
At this stage there was a lot of brown gunge! Initially, I intended to filter it before it cooled by pouring the molten wax through a filter (to catch the big bits) and then a coffee filter (for the small bits). However, I didn’t want to get wax on a metal sieve, and couldn’t think of another way to support the disposable filters safely while pouring the hot wax.
Another video I’d watched had tied the cooled, solid wax inside the filter and re-melted it, so I decided to go with this method as it seemed less risky in terms of messes or spills. Once the wax had cooled and solidified, I broke it into pieces and placed them in 4 layers of cheesecloth, which I tied into a loose bundle. The foil tray was rinsed and dried, and the bundle was placed back in the tray and into the oven. This time I used a slightly higher temperature (250°F). The wax took about 30-40 minutes to fully melt out from the filter, leaving the solid contaminants inside the filter.


At this point, the wax looked pretty clean, and I still didn’t have a good solution for suspending the coffee filter, so I decided to skip that step. I used a smaller, clean (used) foil tray, and poured the wax directly from the larger tray into the smaller one, carefully holding the ‘filter bundle’ back as I did so. I dumped the filter bag in the trash (perhaps it should have gone in the compost?) and let the wax cool. I then cut it into chunks with a meat cleaver, and thankfully, I was able to scrape off and wash away the small amount of wax that ended up on this pricey tool.
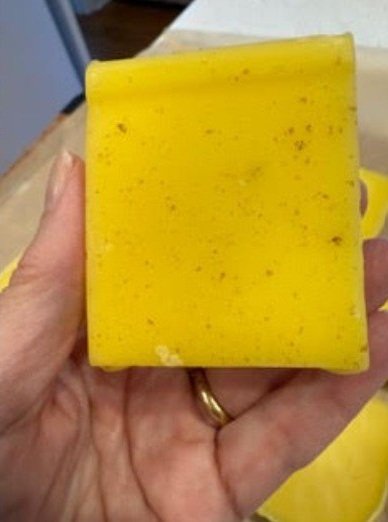
I recovered about 17oz wax. It is a beautiful color, and smells like honey! The finished product has some small bits of stuff on the underside, which the coffee filter would have removed, but I decided that wasn’t worth the effort for my purposes.

If I do this again, I would stick with the oven process (it made no mess in the kitchen), but probably try combining the two melts by tying the original capping material into cheesecloth, although this may turn out to be too bulky. It could also be worth using a finer weave fabric than cheesecloth (plain cotton perhaps) to filter out more of the solid contaminants.
My challenge now is how to use the wax. It is so beautiful, and smells so lovely, that burning it as candles (my original intent) seems such a shame. I’ll keep it for a while and consider how to use it. While it’s sitting on the kitchen counter, it looks remarkably like pieces of French lemon tart :)
A big thank you to Alex Mulholland for sharing this fascinating and beautiful experience with us! We hope it inspires others to explore beeswax processing and that Alex’s insights prove helpful along the way.